
Chainsaw Safety & Operating Tips & Techniques
By The Editors of RenTrain
After reading this article, you may want to take a test on its content. To do so, follow this link: Chainsaw Safety and Operation Test

Chain saws are a frequently rented item and one of the most useful tools in any rental dealer's inventory. They are also one of the most dangerous tools you can rent. Common sense, combined with safe use of your rented chain saw, will make for a pleasureable and efficient rental experience.
Read the following article and refer to is as you undertake tasks commonly associated with chain saws.
NOTE: Despite its name, chain saws are not designed to cut anything other than wood. Chain saws should not be used to cut metal or concrete. Chain saws with specially equipped blades to cut concrete and metal do exist. If you need to cut materials other than trees, check with your rental dealer for the proper tool.
Refueling
Chain saws engines are 2-stroke and require a mixture of gasoline and oil to run properly. In most cases, a fuel/oil mixture of 50:1 provides the best ratio. Check with your rental dealer
CORRECT CHAIN TENSION
To ensure good cutting action and a long chain life, check chain tension frequently. If the chain is too loose, it will come off; if too tight, the chain will bind and overheat. All chains stretch with use. Most of the stretch occurs during the first half hour of operation.
Tip a good way to ensure proper tension for the chain is to place a dime between the chain and the bar. Tighten the chain until it is snug against the dime. Remove the dime and your chain saw is ready to cut at the proper tension.
Prepare Yourself
Always prepare yourself before operating a chain saw. If you have never operated a chain saw, you should obtain training from someone who is familiar with recommended safe operational procedures before attempting to work with a chain saw. Your local rental dealer is an excellent resource for this type of training.
NEVER operate your rented chain saw unless you are in top physical and mental condition. If you are taking medications, under the influence of alcohol or otherwise in a condition where your physical and mental abilities are impaired, do not attempt to operate a chain saw. Chain saws are dangerous machines and can maim or kill the operator. Your chance of injury is significantly decreased if you are rested, alert and healthy.
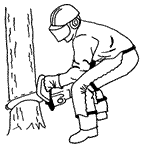 Figure 1.
Make sure you are properly dressed (Figure 1). Safety goggles, hearing protection, steel-toed shoes, hard hat, gloves, and close-fitting clothing are all highly recommended when working with chain saws. Chain-saw resistant chaps, designed to protect the left side of your leg, where most chain saw injuries occur, also are available. Ask your rental dealer what types of safety clothing are available with your rented chain saw.
Saw Selection
There are three sizes of chain saws to choose from based upon the type of work:
- Lightweight saws have an 8-to-12 inch guide bar. They are best for light work, cutting small branches, and felling very small trees (6-to-10 inch diameter at the cut).
- Mid-weight saws have a 14-to-20 inch guide bar. They are excellent for frequent log cutting and felling of small trees (12-to-18 inch diameter at the cut).
- Heavyweight chain saws have a guide bar more than 20 inches long. They are for professional use, not the average consumer.
Consider the type of work you have to do and select the saw accordingly.
Prepare The Saw
Preventive maintenance always pays off with chain saws. Your rented chain saw has gone through a series of thorough pre-rent checks, but you should still take the time to periodically check the condition of your saw during your rental period. Check the chain tension and lubrication system for proper function and make sure the air filter is kept clean of debris and dust.
Proper chain tension is essential to long chain life and safer cutting. All chain saws stretch with use and require frequent checking and re-adjusting. If you allow your chain to become too loose, it may derail and whip about dangerously. If you over-tighten your chain, it will bind and wear prematurely. Good lubrication helps to prolong chain life and maintain tension adjustment. Make a point to check the oil frequently and re-fill when necessary. Make sure you use the correct bar oil that comes with your rented chain saw.
Tip a good way to ensure proper tension for the chain is to place a dime between the chain and the bar. Tighten the chain until it is snug against the dime. Remove the dime and your chain saw is ready to cut at the proper tension.
Starting and Operating Techniques
- WARNING The saw chain will rotate when the saw is started. The saw chain can cause serious injury. Always clear a safe work area before starting a chain saw.
- IMPORTANT The engine is controlled by a two-position "ON-OFF" switch located near the throttle on the rear handle.
- Always use both hands when starting a chain saw, one to hold the saw and the other to pull the starter rope.
- Some chain saws are designed with a foothold for starting. Place the saw on the ground, securing the saw by placing your rightr foot inside the rear handle and your left hand firmly on the front handle.
- Grip the top handle of the saw firmly and pull the starter rope slowly until you feel the starting mechanism engage. (Figure 2).
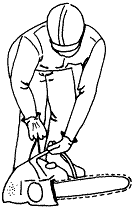 Figure 2
- Start the saw by pulling the starter cord upward quickly.
- CAUTION The recoil starter can be damaged by abuse. Never pull the starter cord to its full length. Always engage the starter before cranking the engine. Always rewind the starter cord slowly.
When the engine fires:
- Push the choke control in to its original position (choke is open.)
- If the engine does not continue to run, pull the recoil again.
- WARNING The saw will turn as the engine accelerates
- Operating the throttle will automatically disengage the "fast-idle" setting.
- DO NOT attempt to start a chain saw while holding it in mid-air with one hand. Always start it on the ground on a stable and level surface.
- Always use both hands to control the chain saw. NEVER attempt to cut a tree or limb with only one hand. NEVER force a chain saw through a cut, if it is properly sharpened and adjusted it will cut easily, almost by itself. Let the chain saw do the work.
NOTE: The hardness of the wood will have a major effect on how quickly it cuts.
Felling The Tree
Felling trees requires a thoughtful approach. There are many things to consider:
- Examine the tree to determine which way it leans and how it's weighted. This will have a lot to do with the direction of the fall.
- Examine the surrounding area and make sure it is free of people, power and utility lines and any other objects the tree might strike with the fall.
- Clear the area of people, vehicles, branches and debris.
- If an electric power line runs anywhere near the vicinity of the tree DO NOT attempt to work on the tree unless you are absolutely certain that it will not interfere with the electric line. If you must fell the tree and you suspect a problem, call your local utility to remove the tree. They have the expertise to do it safely.
- Gauge wind speed and direction. If windy or gusty conditions exist, postpone felling until conditions improve.
- Carefully observe the area for other trees. A cut tree that becomes entangled with a standing tree and does not properly fall creates a very dangerous hazard. Determine the direction of fall carefully as well as an escape route. DO NOT wait until the tree is falling to decide which way you should move to avoid being hit.
- Plan ahead! Always plan an escape route to a safe location from your work area. You should plan a path of retreat along a line of approximately 45 degrees from the direction of the falling tree (Figure 3). This is a very important consideration when felling trees. Select a place beforehand to set the chain saw. NEVER run with a chain saw in your hand, operating or not. If a dangerous condition occurs, turn off the chain saw and set it down. Chains saws are replaceable. You are not.
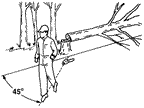 Figure 3
- Plan a safe, unobstructed path of retreat before making felling cut. When tree begins to fall, remove safe, stop motor, set it on ground and retreat rapidly at 45-degree angle from line of fall.
- Plan your cuts carefully. Under most conditions, chain saws can cut smaller trees (up to a 6-inch diameter) with a single pass. Larger trees may require a series of cuts as described in the next section.
Felling large trees.
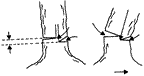 Figure 4
Follow these guidelines when felling larger trees (7-inch diameters and up).
- Start with a two-cut, 45-degree notch on the side of the tree specific to the direction of the fall.
- Cut the bottom of the notch first, about one third of the way through the diameter. Make the second at a 45-degree angle that meets the depth of the first cut.
- Make the felling cut from the opposite side of the tree, approximately 2 inches higher than the floor of the notch cut on the opposite side of the tree.
- Do not cut all the way through. Leave a hinge of about 1/8 to 1/6 of the diameter where you are cutting. This keeps the tree kicking back and upward as it falls. The size of the hinge may vary depending on when the tree starts to fall.
- When the tree starts to fall, shut off the chain saw, set it down safely (don't throw it), and leave the area along your planned escape route. DO NOT return to the site until the tree is down and no longer moving.
- If the tree should roll, let it. One person cannot stop or control a moving tree.
- Some trees are very well balanced and do not fall after making the felling cut. In this case use wedges to start the fall and influence it's direction. Always use two wedges and a sledge with a face 1/3 larger than the face of the wedge.
- Plastic wedges are safer than metal. They will not damage the saw teeth or chain. Always remove the chain saw when driving wedged into the cut. Strike the wedge carefully. Careless blows may result in popping the wedge from the cut. This may result in the tree falling backward, on you.
- Never use an axe as the wedge or driver. Axe heads may shatter and flying pieces can cause injury.
Limbing The Tree
Follow these steps when limbing trees:
- Before you begin limbing felled or fallen trees, make sure the fallen tree is stable and will not move as you work.
- Examine the situation at every limb you intend to remove. Make sure the limb will not bind against the saw as you cut.
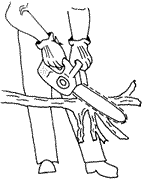 Figure 5
 - Whenever possible, cut limbs on the opposite side of the tree trunk from which you are working. Doing so keeps the tree trunk between you and the saw (Figure 5).
- NEVER stand on the downhill side when removing limbs. Remember that tree trunks are circular and may roll as you remove limbs.
- Be aware of limbs that may spring out from released tension during the cut. These limbs can cause injury.
- Whenever possible, keep the tree limb or similar barrier between yourself and the saw blade.
- Larger limbs may require more than one cut for safe removal from the tree trunk. Plan your cuts to eliminate the possibility of binding. Stored energy is a very real danger with chain saws and can cause a cut to pinch the blade and immobilize the saw. Use a wedge if you think binding may occur.
- Always plan an escape route. Large limbs may roll after you remove them from the trunk.
- When cutting large limbs and/or the tree trunk into convenient lengths (bucking), make sure to support the trunk along its entire length so it will not roll. Block or wedge the trunk in place, if needed.
- Cut downward from the top of the trunk (overbuck) approximaetly 1/3 of the diameter and then roll the trunk over to make final cuts.
- Use wedges to keep the cut open for logs too heavy to roll over. Always drive wedges with care to ensure they will not encounter the chain saw. Even though this should prevent pinching, always be alert to the situation. (Figure 6).
 Figure 6
Figure 6: Stand on uphill side when cutting because log may roll.
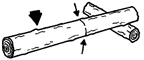 Figure 7
 - If the limb or tree trunk is supported as shown in Figure 7, cut downward 1/3 of the way through the trunk and then finish by cutting upward from the underside to meet the first cut. Make sure you elevate the limb or trunk enough on the high end to allow enough room to keep the saw out of the dirt. The teeth will throw debris and cause the teeth to dull prematurely and increase wear on the chain.
 Figure 8
 - As limbs become smaller from cutting, you might want to consider using a saw buck. Saw bucks hold small logs or limbs at a comfortable height and prevent them from rolling during cutting. (Figure 8).
Kick Back Safety Tips

Kickback is a common event when using a chainsaw. Kickback occurs when the teeth of the chain catch on something as they rotate around the tip of the blade. The teeth may have enough force to cause the blade to kick back violently toward you, hence the term "kickback." Figure 9 shows three situations that can cause kickback:
- When the nose of the blade strikes another object.
- Starting a bore cut improperly.
- When the blade nose or tip catches the bottom or side of a saw cut during reinsertion.
The best defense against kickback is to keep the tip guard on the chain saw. However this does limit what you can do with the tool. Most rental chains saws have a chain-brake or kickback guard. Always keep the kickback guard in place when operating your rented chain saw.
Always be alert for situations where the blade may pinch and plan accordingly. Cut branches at the base of the blade, DO NOT saw with the tip of the blade. Use a high chain speed when reinserting the blade in a cut or removing it from a cut. Keep the saw teeth sharp so they will cut; dull teeth are more likely to cause a kickback. Always cut below shoulder height, otherwise the saw is difficult to control and is too close to your face.
Figure 9. Avoiding kick-back.
Key Safety Tips
- Always avoid making cuts with the saw between your legs, always cut with the saw to the outside of your legs.
- Don't stand on a log and saw between your feet.
- Always stand to one side of the limb you are to cut, never straddle it.
- Always keep in mind where the chain will go if it breaks, never position yourself or other people in line with the chain.
- Keep the chain out of the dirt, debris will fly, the teeth will be dulled and the chain life shortened considerably.
Transport and Storage of the Chain Saw
Always transport your rented chain saw in a level position with the gas cap up. Tipping will cause gasoline spillage of gasoline and create a fire hazard. DO NOT carry the saw in the passenger area of a vehicle. If an accident occurs, chain saws may fly around the passenger area, creating a hazardous situation. Most rental dealers provide a chain saw case with the saw. If they don't, make sure your saw has a chain guard in place during transport.